Sparkle (featured mode)
|
|
In this mode, Sparkle's center light will not flash: it sends all flashing data to the lightboards, though the tiny red LED will be lit.
(If your Sparkle kit came with lightboards and sensors, it can work in this mode)
All components (sensors, lights, motors) have a tiny microcontroller that allows them to communicate with Sparkle, so you can interact with the different sensors and actuators without writing special code to deal with each one.

This system uses the same pair of wires to connect all the pieces, which reduces the chances of short circuits - very important for a 3-dimensional medium like clothing. As a result, these sensors work only with lightboards, not with regular LEDs, and you can use only compatible components (most likely from our store). Furthermore, this mode uses up more energy, so you'd need a large CR2032 battery or 2 AA batteries in series. 3 volts only.
|
|
It's not working
 |
Sparkle has a tiny red light that tells you what's going on: |
| when red light is |
Sparkle is |
| always lit |
running a program, though that program may not be flashing any lights. Send it a new program |
| flashing rapidly |
waiting for a program. Press the touch strip to make it run again |
| dimly flashing once a second |
sleeping. Press the touch strip to wake it up |
| off |
we have a problem |
If you cannot see this light:
- double-check your connections
- make sure you sewed through the holes several times for a tight fit
- look for short circuits, places where two threads might be touching
- use a new battery
- review the sparkle sewing tutorial
- totally undo the circuit, and sew only two things: Sparkle, and battery
- now add other lightboards, one by one, testing each time you add one, and then finally the sensor.
|
|
Sparkle is flashing, but the lightboards are not
In this case, the first thing to do would be to reset Sparkle, to make Sparkle's center light STOP flashing. You want only the tiny red LED to be lit.
 |
- turn Sparkle over
- connect the plus and minus holes to a 3V battery
- briefly connect the reset pad to the reset hole with tweezers or needle
- wait 1 second
- repeat steps 1-3 until Sparkle's center stops, but the lightboards flash
- You can do this even after the project is sewn down, just use a pair of tweezers.
|
|
|
How do I connect it?

- Connect Sparkle to the battery holder using conductive thread, conductive paint, or regular wire
- Use two separate threads, one for plus and one for minus
- Go through each hole 4-6 times to make a good connection, not just once
- Make sure there is no short circuit
- Insert a 3 volt battery. It should start flashing
|
- while it's still connected to the battery, turn Sparkle over
- briefly connect the reset pad to the reset hole with tweezers or needle
- wait 1 second
- repeat steps 1-3 until Sparkle's center stops, but the tiny red LED stays on
- You can do this even after the project is sewn down, just use a pair of tweezers
|
- Next, with the power on, add a lightboard (with single dot) to the right of Sparkle
- Use two separate threads, one for plus and one for minus
- Make sure lightboard plus is connected to the top right hole on Sparkle
- Make sure lightboard minus is connected to the bottom right hole on Sparkle
- Go through each holes 4-6 times to make a good connection, not just once
- When this lightboard is flashing, add the other lightboards in the same way
- You can connect lightboards on either side of Sparkle
- You can use up to 20 lightboards, in any color combination
- For sensors, the plus side is at the top, closest to the sensor name
|
|
What sensors can I use?
There are two types of inputs for Sparkle:
-
Sensors that measure how much of something there is: sound, light, accelerometer, temperature, and custom.

-
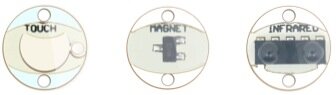
Switches that measure if something exists. These switches don't report the amount of sensed value, but they let Sparkle know if they have been touched, if there is a magnet nearby (about 2 inches or less), or if it's receiving an infrared signal from any remote control.
You can use one sensor AND one switch in a project, but not two sensors at the same time. So you could combine light sensor with magnet switch, or an accelerometer with infrared switch, but not sound and light sensors.
|
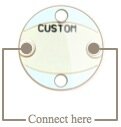
The custom sensor senses resistance, so you can connect (e.g.) resistive fabric to the two holes to make a pressure sensor, or stretch sensor. Its built in resistance is 100 kilo-ohms.
|
 |
|
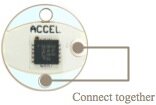
The accelerometer normally measures movement, but if you connect these two holes, it will detect 1 of 6 orientations. Tutorial coming soon. |
|
With this switch, Sparkle can react to your touch. You can also connect the hole on the side to a patch of conductive cloth to create a larger touch pad.
|

|
 |
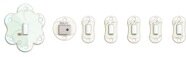
Because sensors need to communicate with Sparkle, we have to use lightboards instead of regular LEDs or sequins. Each one has an ID (1-5), marked by the number of strokes or dots it has. Connect up to 20 in any color combination. |
|
|
How do I turn it off?
- Hold your finger, a needle, or tweezers to the strip under the tiny red LED
- After 1 second, the tiny red LED should start flashing
- Keep your finger on the touch strip for more than 1 second
- The red LED will fade off, and Sparkle will go to sleep
- Press the touch strip again to wake it up.
- Check out the video for more
|
|
How do I program it?
- Go to: aniomagic.com/program
- Hold your finger, a needle, or tweezers to the strip under the tiny red LED.
- After 1 second, the tiny red LED should start flashing.
- Put Sparkle in front of the icon on the screen and click send.
|
|
It doesn't enter programming mode
The touch strip measures the capacitance in your finger. It might help to use a needle or paperclip for better contact. Moistening your finger works too. |
|
It's not getting new programs from the screen
- Hold Sparkle closer to the screen.
- Make the screen brighter or change the contrast.
- Dim the lights; a brightly lit environment overpowers the sensor.
- If your web browser is playing a video or doing some other activity, it throws off the timing.
Close all other browser windows and see if this solves the problem.
|
|
What kind of programs can I create?
There are two ways to program Sparkle:
- Making choices from the programming menu
- Writing textual programs
Choose a flashing pattern and speed from the NORMAL side. Then choose a pattern, speed, and repetition from the SPECIAL side.
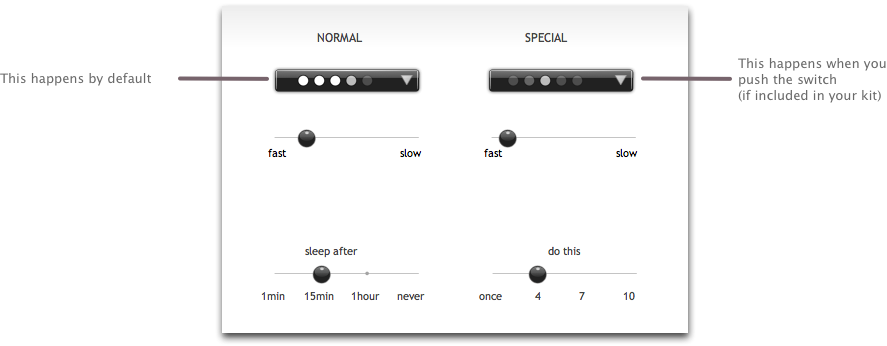
To make Sparkle act like a sensor meter (turn on more lights when there's lounder sound or higher temperatures), choose this screen.

| Detect a wide range, like completely dark to very bright. |
Detect a small range, like changes in room temperature. |
Set a high threshold, so Sparkle responds only when it gets really loud. |
 |
 |
 |
You can also write programs in the textual programming language, for example:
(always
(if (touched)
(twinkle 2)
(center 30)) |
(always
(if (> sensor 5)
(twinkle 2)
(center 30)) |
This tells Sparkle to do the twinkle action when you touch the touch sensor,
otherwise glow its center light slowly (30-second duration). |
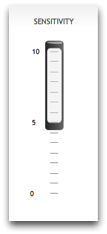
This tells Sparkle to do the twinkle action when the sensor level rises above 5, otherwise glow its center light slowly (30-second duration). It doesn't matter if it's a sound sensor, light sensor, or accelerometer; the lights will flash when the level of sound, light, or motion rises above a certain threshold (the minimum is 1 and the maximum is 10). |
Get more in-depth with programming.
|
|
How long does it run?
| # lights |
CR1220
40mAh |
CR2016
130mAh |
CR2032
250mAh |
AAA
750mAh |
LiPo
1000mAh |
AA
1500mAh |
current |
| 5 |
- |
8 hours |
18 |
36 |
80 |
120 |
45mA |
| 10 |
- |
3 hours |
15 |
24 |
72 |
90 |
70mA |
| 20 |
- |
- |
- |
16 |
48 |
36 |
130mA |
| 40 |
- |
- |
- |
12 |
16 |
18 |
180mA |
|
|
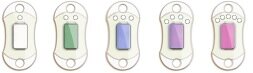
What are the LED characteristics (volts / brightness / wavelengths)?
LED
color |
Dominant
wavelength |
Luminous
intensity (IF=20mA) |
Relative
brightness |
Forward
voltage |
Current
@3V |
Resistor
on board |
| diamond (white) |
X=0.285, Y=0.295 |
260mcd |
1.0 (basis) |
3.1V |
20mA |
100Ω |
| emerald (green) |
530nm |
300mcd |
1.2x |
2.8V |
25mA |
150Ω |
| amethyst (purple/uv) |
380nm |
80mcd |
0.3x |
3.2V |
15mA |
27Ω |
| sapphire (blue) |
470nm |
290mcd |
1.1x |
3.1V |
20mA |
100Ω |
| rose quartz (pink) |
---- |
110mcd |
0.4x |
3.2 |
15mA |
27Ω |
| fire opal (orange) |
640nm |
300mcd |
1.2x |
2.4V |
20mA |
100Ω |
| citrine (yellow) |
590nm |
280mcd |
1.1x |
2.6V |
20mA |
100Ω |
|
|
|
|